Ultimate Guide to Tarp Projects: DIY Tips For Custom Outdoor Gear
Discover creative tarp projects to enhance your outdoor experiences. Save money and craft custom gear with our step-by-step guide!

- Introduction
- Introduction to Tarps Why Every Outdoor Ensoiast Needs One
- Key Benefits of Choosing DIY Tarp Projects
- Essential Materials for Your Tarp Projects
- Step-by-Step Guide Creating a Tarp Shelter
- Top DIY Ideas Using Tarps for Outdoors
- Additional Tarp Accessories to Enhance Your Gear
- Conclusion and Next Steps for Outdoor Adventures
Introduction
Imagine transforming a simple tarp into your ultimate outdoor companion—this guide will show you how! Picture it: a trusty tarp that serves not just as a cover but as a versatile tool for your adventures. Whether you're facing a sudden downpour, need a windbreak, or want a comfortable surface to lounge on, a good tarp can do it all. You might be thinking, “Why bother?” Well, here’s the rub: outdoor gear can be a wallet-buster. Honestly, do you really want to shell out heaps of cash for gear that might only see the light of day a few times a year? I thought not!
The reality is many outdoor lovers overspend on gear that they could easily create or adapt themselves. A tarp is often an overlooked hero in the world of DIY camping solutions. With just a bit of creativity and some time, you can tackle those pesky needs and have a blast while doing it. Who knew a piece of fabric could become your best buddy on a camping trip?
So, what's the solution? By following our step-by-step instructions, you’ll not only save some coin but also enhance your whole camping experience. We’ll dive deep into the world of cat cut tarp myog, displaying creative ways to use that tarp—whether it’s for a hammock, a shelter, or even an improvised picnic area. Just think of all the possibilities! You can become the master of tarp ingenuity, impressing your mates around the campfire with your DIY prowess.
Let’s get to the fun part! Ready to cut those tarps and create some magic? Here we go!
Introduction to Tarps: Why Every Outdoor Ensoiast Needs One
When you head into the great outdoors, whether for camping, hiking, or just a picnic in the park, one gear item stands out—tarps. These versatile pieces of gear often get overlooked, but they’re crucial for any outdoor ensoiast. Let’s take a closer look at why every adventurer should consider adding one to their kit, especially if you’ve got your sights set on a cat cut tarp myog setup.
Overview of Tarp Types and Their Functions
Tarps come in all shapes and sizes, pretty much like the various creatures you might stumble upon in the woods—think of it like magical creatures, each with their unique purpose. You’ve got your standard polyethylene tarps, which are great if you're looking for something waterproof. Then there are canvas tarps, perfect for those cooler nights. And let’s not forget about silnylon tarps—super lightweight and perfect for backpacking. Each type serves a different function: shelter, ground cover, or even a makeshift hammock if you’re feeling crafty!
Benefits of Tarps in Camping and Outdoor Activities
Now, let’s chat about some actual benefits of having a tarp in your gear stash. First up, you’ve got protection from the elements. Rainy days can be a drag. A tarp can keep your campsite dry—trust me, nothing is worse than waking up to a soggy sleeping bag. Plus, if you’re sitting around the campfire and it starts to drizzle, a tarp can be your lifesaver.
Another plus? They’re incredibly lightweight. You can fold them up small enough to fit in your pack, so they won’t weigh you down. And like the trusty sword of Beowulf, they’re reliable. Tarps can help you create an instant shelter, windbreak, or even a cooking area, transforming any outdoor space into your temporary kingdom.
Insights into Durability and Utility of Tarpaulin
Durability is another feather in the cap of tarps. The best ones are made from tough materials that can handle a good beating. I’ve had my fair share of mishaps—I once thought I’d save a few bucks on a cheap tarp. Big mistake. It tore during a storm, and you can guess how fun that night turned out.
When talking utility, tarps are downright ingenious. You can use them in countless ways: ground cover to keep your gear clean, a shade when the sun’s blazing, or even as an emergency signal if things go sideways. They’re the Swiss Army knife of the camping world, and as an outdoor ensoiast, you’ll always want one within reach.
So there you have it. If you’re gearing up for your next adventure, don’t skimp on a tarp. Whether you’re looking to create a cat cut tarp myog setup or just keep things dry, having a tarp handy can save the day. Trust me, it’s one piece of gear you won't regret having around.
Key Benefits of Choosing DIY Tarp Projects
Alright, let’s chat about the fantastic world of DIY tarp projects, particularly the cat cut tarp myog. You might be thinking, “Why bother?” Well, let me share a few good reasons that’ll have you rolling up your sleeves in no time.
Cost-effectiveness of Making Your Own Gear
First up, let’s tackle the wallet issue. We all know gear can cost an arm and a leg—why's that? A simple tarp can run you a pretty penny when bought from stores. But here’s the scoop: with DIY, you can whip up your own tarp for a fraction of the price. Sure, you’ll have to invest a little time, but that's worth it, right? I mean, who wouldn’t want an extra buck or two in their pocket?
Now, when I first started making my own gear, I thought, “This is going to be a disaster!” But you know what? It turned out fine! In fact, it was a lot of fun to see my effort turn into something useful.
Customization Options for Specific Needs
Next, let’s talk about customization. When you create your cat cut tarp myog, you can tweak every little bit to fit your needs. Maybe you need extra pockets, or a special color that suits your style—who knows? You’re the boss now!
As I sank my teeth into making my own tarps, I learned that my vision sometimes took crazy turns. At one point, I thought, “Why not make it pop with some bright orange?” Turns out, the bright color didn’t mesh well with the forest backdrop I was camping in. Lesson learned!
Environmental Benefits of DIY Projects
Last but not least, let’s chat about Mother Earth. You might not think of it this way, but DIY projects can be a nod to our planet. By making your own gear, you avoid contributing to mass production and all that waste.
Plus, you get to choose eco-friendly materials! That’s like a bluebird on a sunny day, isn’t it? And let me tell you, every little bit helps. Sometimes, I grab scraps from other projects and give them new life. It feels good to be resourceful.
So, if you're mulling over starting a cat cut tarp myog, just remember these key benefits. Making your own gear is not just fun; it saves you money, meets your specific needs, and helps the planet. That’s a win-win in my book! Ready to dive in? Grab some fabric and let’s get crafting!
Essential Materials for Your Tarp Projects
Alright, let's dive into what you really need for those cat cut tarp myog adventures. It's all about having the right materials to get the job done right.
Types of Tarps: Waterproof Fabric and Lightweight Options
First things first, you’ve got to choose the right tarp fabric. You’ve got two main types to consider: waterproof and lightweight. If you're aiming to keep dry while out in the wild—think of those drizzly British afternoons—you might want a sturdy waterproof tarp. These are usually made from materials like nylon or polyester with a special coating. They’ll keep the moisture at bay while you sip your tea (or whatever floats your boat).
On the flip side, if you're going ultralight and need something easy to carry, lightweight fabric is where it’s at. These tarps are like a good ale on a warm summer day; they keep things breezy without the weight. So, if you're hiking for hours, you'll appreciate that lightness when you finally pitch your tent. Keep in mind, though, they won't hold up quite as well in a storm. Choose wisely, my friend!
Necessary Tools and Accessories for Tarp Projects
Next up are the tools and accessories. You can't just throw a tarp up and expect it to stay put, now can you? You’ll need some basic tools. A pair of sturdy scissors or a fabric cutter is a must for those neat cuts. Then there are, of course, some robust stakes and guylines. I can't stress the importance of a good stake—nothing worse than your tarp blowing away like a wayward sheep on a windy day.
Don’t forget about a sewing kit as well. If you’re feeling crafty, you might add in some extra features like tie-outs or reinforced edges. Trust me, those will save you a lot of misery when the weather turns.
Sourcing Materials: Where to Find Budget Outdoor Supplies
Now, let's talk turkey—where to find all this gear without breaking the bank. There are plenty of options out there. Local outdoor shops usually have a goldmine of materials, but hey, that can get pricey. Look for clearance sales; I once scored some great waterproof fabric at half price because it was last season’s color.
Then, there are online stores where you can snag great deals. Websites like eBay or even Amazon sometimes have sellers clearing out excess stock. Just don’t get lost in the never-ending scroll—I've lost a whole afternoon down that rabbit hole before. And don't sleep on thrift stores! You’d be amazed what outdoor gear people donate. I once found a barely-used tarp for my camping trip; it was practically a steal!
In conclusion—and I mean this—your tarp projects can be both fun and functional if you have the right materials. So whether you’re going for a solid waterproof shelter or a lightweight option for those summer nights under the stars, just make sure you’ve got the right supplies. Happy crafting!
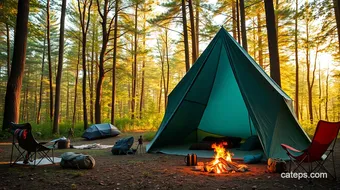
Step-by-Step Guide: Creating a Tarp Shelter
Building a tarp shelter is like channeling your inner Bear Grylls without the extreme circumstances — and maybe with a bit more cozy comfort in mind. Grab your tarp, and let’s get into it.
Planning Your Tarp Shelter Design
First things first, let’s sketch out what you're aiming for. You’ll want to consider the location — is it on soft ground or rocky terrain? Is there wind coming in? And, what about rain? Think of where you’d like your door and how you want it to catch the light (or not). A popular choice is the cat cut tarp myog style, which gives you a bit of everything: coverage and airflow. Try using an old bedsheet or a large piece of cardboard to visualize your design before you cut — it’ll give you a good picture.
Detailed Instructions: Cutting and Assembling Your Tarp
Alright, time for some real action.
-
Select Your Tarp : Choose a durable tarp. A nylon or polyester tarp works best — lightweight yet tough. You could even find some at your local outdoor shop.
-
Measurements : If you’re into numbers, measure out how big you want your shelter. Aim for at least 10 feet by 12 feet for a decent space. But hey, if you want something more snug, go smaller!
-
Cutting : Lay the tarp flat on a clean surface. Use a marker and a straight edge to outline the shape you want, like a triangle for a quick A-frame. Grab your scissors or a sharp knife, and cut along the lines. Remember: measure twice, cut once! Trust me, I've got a hidden tarp in the garden from my impatience.
-
Adding Tie-Outs : Fold over the edges and sew or use duct tape to create tie-outs. These are essential for anchoring your shelter. You gotta be able to tie it down nice and tight.
-
Assembling : Find your spot. Use trekking poles or sturdy branches as poles if you didn't bring your own. Set up your tarp by staking the corners or trailing it over a tree limb. Voilà, your shelter is shaping up!
Tips for Securing Your Shelter in Different Weather Conditions
Here's where it gets tricky. Keeping your shelter secure in wild weather is like herding cats... but it can be done!
-
Windy Days : Make sure to stake down your tarp tight. Use rocks to hold down the edges if you can’t get pegs deep into the ground. A low profile keeps the wind from grabbing it like a kite!
-
Rainy Nights : Angle it downwards for better runoff. A slight slope helps water flow away. You can also place a poncho underneath or throw a groundsheet inside for added protection.
-
Snow : Beef it up with extra support. Lay snow around the edges to hold it down, and make sure your poles are secure — you wouldn't want a surprise when the winter wonderland starts turning into a cave-in!
And just one more thing — it never hurts to practice setting this up in your backyard before heading out. You might discover that that cat cut tarp myog takes on a new light when it’s you, your tarp, and the elements! Happy building!
Top DIY Ideas Using Tarps for Outdoors
When it comes to camping or just hanging out in your backyard, tarps are the unsung heroes of outdoor adventures. They’re versatile, easy to use, and with a bit of creativity, they can transform your outdoor experience. Here’s how you can make the most out of tarps — and some personal experiences to boot!
Ideas for Creating Tarp Shelters and Tents
First off, let’s chat shelters. Nothing says "I’m ready for the outdoors" quite like a well-constructed tarp shelter. You can whip up a simple A-frame with just a couple of poles and some rope. Picture this: You find two trees, tie up your tarp between them, and voilà! Instant shade or rain cover. Just watch it flapping in the wind; you wouldn’t want it to turn into a sailboat!
For a more solid structure, consider a cat cut tarp MYOG (make your own gear). This unique design helps your tarp catch the wind just right while maintaining stability. It's a little more advanced, but the satisfaction of crafting your own gear is unbeatable. Remember what I learned the hard way? Always stake down your corners well — nothing worse than waking up in the middle of the night to find your shelter has taken flight!
Using Tarps for Ground Covers and Gear Protection
Now, let’s talk about ground covers. A tarp can act as your trusty barrier between you and the uneven ground. Lay it out before setting up your tent. It’ll keep the moisture from creeping in and protect your gear from dirt. Plus, if you’re like me, and you've sat on damp grass more times than you can count, you know it’s a lifesaver.
Speaking of gear, tarps are like the trusty sidekicks of the outdoors. Use them to cover your belongings during a sudden downpour — trust me, it beats rummaging through a soaked backpack. Just drape your tarp over your gear or hang it from a tree. It's a bit like building a protective fortress for your stuff. And, hey, you might even start a trend in your camping circle!
Creative Tarp Accessories: Rain Flies and Shade Structures
Now, let’s get creative! If you want to kick things up a notch, consider making tarp accessories like rain flies. Why? They provide extra protection against the elements. You can set one up over your campsite, making sure you stay dry even if Mother Nature has other plans. Just think of it as your umbrella when you’re away from home.
Shade structures are another fun idea. If you’re spending a scorching day outside, a tarp can be rigged to provide the shade you need. Use poles or trees to create a makeshift canopy. It’s perfect for a picnic or just lounging about with a good book. And, if you find the perfect angle, you might just avoid getting fried to a crisp.
Inspiration for using tarps is everywhere. With a bit of innovation and the right mindset, you can craft some awesome setups. So, gather your materials, embrace trial and error, and let your creativity run wild. There's no wrong way to make your outdoor experience better — especially when you embrace DIY with tarps! It’s all about comfort, protection, and having a good time under the open sky.
Additional Tarp Accessories to Enhance Your Gear
So, you’re diving into the wonderful world of cat cut tarp myog? You're in for a treat! But let’s talk about how to kick it up a notch. There’s more to tarps than just fabric and some knots. With the right accessories, you can really boost your tarp’s functionality.
Recommended Accessories to Improve Tarp Functionality
First off, let’s chat about accessories. Nothing beats a good set of guylines. Trust me, having sturdy guylines will keep your tarp secure, even if the wind is having a fit. I learned the hard way when mine flapped about like a bat in a blender. Consider using reflective guylines too. They’re visible at night, making navigation a whole lot easier—especially when you're finding your way back after a late-night campfire.
Then there are tarp stakes. You could use sticks, of course, but sturdy stakes really do the job. I once used a bent nail... not my best move. A good stake holds your tarp down tight, even in a downpour.
Don't underestimate a tarp ridgeline. This nifty accessory is like the backbone of your setup. It allows you to hang your tarp high and dry, offering a greater covered space.
Lastly, you might want to look into a tarp sleeve or stuff sack. It’s a joy to pack your tarp neatly after a long day. Plus, you’ll save some space — no more wrestling with a bulky tarp!
Comparison of Utility Tarps and Outdoor Gear
Now, if you're scratching your head about the difference between utility tarps and outdoor gear, let's break it down, shall we? Utility tarps are usually thicker and intended for heavy-duty tasks like covering firewood or furniture during a storm. Think of them as the trusty old hound—loyal and reliable, but not necessarily going on a fancy adventure.
On the flip side, outdoor gear like hiking tarps is lighter and often made for specific uses like sleeping or dining in the wild. They’re like your adventurous cousin who never misses a chance to explore. If you want a versatile shelter, a dedicated tarp is the way to go. So if you're planning on toting your gear on a trail, a lighter tarp could save you some back pain.
Integrating Eco-Friendly Tarps into Your Projects
And speaking of saving, have you checked out eco-friendly tarps? These beauties are made from recycled materials and have a smaller carbon footprint. Win-win, right? You get your tarp love while caring for Mother Earth.
Incorporating eco-friendly tarps into your projects is easier than you'd think. They come in various sizes and styles, allowing you to join the myog movement with style and sustainability. You can fashion a cozy shelter, set up a windbreak, or create a communal hangout spot—perfect for sharing stories and laughs with friends after a long hike.
So, the next time you're puzzling over “cat cut tarp myog,” consider these accessories, gear comparisons, and eco-friendly options. You'll be set up for whatever adventure awaits. Happy crafting!
Conclusion and Next Steps for Outdoor Adventures
So, let’s take a moment to think about what we’ve dug into with the cat cut tarp myog project. First off, it’s like crafting your own shield for the great outdoors. You get the satisfaction of knowing you made something useful. Plus, you can customize it to fit your needs — whether you're staying dry in a downpour or just shading yourself from an unexpected sunburst. Not to mention, it’s often lighter and cheaper than store-bought options. So win-win, right?
Feeling inspired? Why not try your hand at more DIY tarp projects? There's a whole world of outdoor gear just waiting for your creativity. Think about making a cozy hammocks, or maybe even a rainfly for your tent. The satisfaction of DIY gear goes beyond just saving a few quid — it's about the stories you create while making them. Trust me, tales of failed projects can be as entertaining as the camping trips themselves!
Before you dash off to your favorite crafting corner, remember this: making your own gear is more than just a hobby. It's about enhancing your outdoor experiences. Every camping trip, hiking adventure, or day at the beach can feel just a bit more special when you’re using gear designed by your own two hands. You discover what works best while learning along the way. Perhaps you’ll even forge new friendships with fellow outdoor ensoiasts who share your passion for crafting.
So, what’s next? look into into that project you’ve been eyeing. Gather your materials, roll up your sleeves, and get to work! Mistakes? Oh, you’ll make a few — but they often lead to the best memories. And who knows, you might just find your new favorite thing to do is spend evenings tinkering on gear that makes your time outside even more enjoyable. Happy crafting, my fellow adventurer!
Previous article: Exploring Catwoman in Adult Fan Art
Next article: The Ultimate Guide to Camo DCF Tarps
Ultimate Guide to Tarp Projects: DIY Tips For Custom Outdoor Gear: Share, Rating and Comments
0.0 / 5
0 Review